> Contents
Optimal Blackjack Strategy: The Complete 2026 Guide
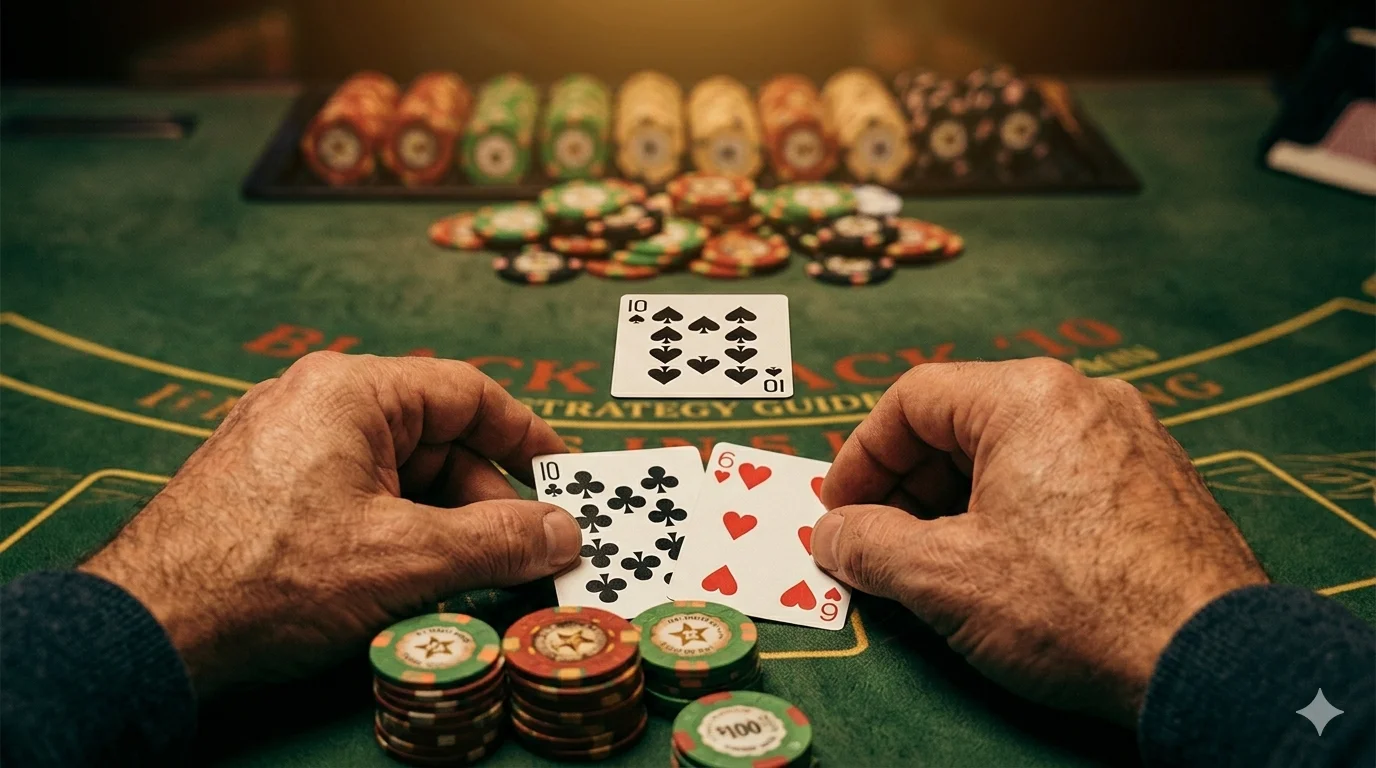
Picture this: you're at a $25 table, holding 10-6 against the dealer's 10. Basic strategy says hit. But what if knowing that your 16 contains a 10 changes the correct play to stand — and that single adjustment saves you $3 per hour?
That's the difference between basic strategy and optimal strategy. In 2026, most blackjack guides still teach total-dependent decisions as if they're the final word. They're not. Optimal strategy considers the exact composition of your hand, squeezing an extra 0.22% edge reduction that basic strategy leaves on the table.
This guide gives you the complete optimal strategy tables, an interactive trainer to test any hand, and the math behind every composition-dependent decision.
TL;DR — Optimal Strategy at a Glance
Key Numbers Table
| Strategy Level | House Edge (6D S17) | Edge vs No Strategy | Skill Required |
|---|---|---|---|
| No Strategy | ~5.00% | — | None |
| Mimic Dealer | ~5.50% | +0.50% | None |
| Never Bust | ~3.90% | -1.10% | Low |
| Basic Strategy | ~0.50% | -4.50% | Medium |
| Optimal Strategy | ~0.28% | -4.72% | Medium-High |
| Card Counting | -0.50% to -1.50% | -5.50%+ | High |
Basic vs Optimal vs Card Counting
Think of it as three tiers. Basic strategy is the floor — you're playing nearly perfect blackjack by memorizing one chart. Optimal strategy is the ceiling for non-counters — you're making composition-dependent adjustments that basic strategy misses. Card counting breaks through the ceiling entirely by changing your bet size based on remaining cards.
For most players, basic strategy captures 95% of the value. But if you play regularly, that extra 0.22% from optimal play saves real money — roughly $22 per 10,000 hands at a $10 table. Use our house edge calculator to see exactly how much your specific game costs per hour.
Why "Basic" Strategy Isn't Actually Optimal (2026)
Every blackjack book teaches "basic strategy" as the mathematically correct play. And it's close — but not quite right. Here's what basic strategy gets wrong, and why it matters.
What Basic Strategy Gets Right
Basic strategy is brilliant for what it is: a single chart that tells you the best total-dependent decision for every hand. It reduces the house edge from ~5% (random play) to ~0.50% (6-deck S17). That's a 90% reduction in the casino's advantage.
The chart works by calculating the expected value of every possible action (hit, stand, double, split, surrender) for every combination of your hand total and the dealer's upcard. For most hands, the total is all that matters.
The 15-20 Hands Where Optimal Play Differs
Here's where it gets interesting. For about 15-20 specific situations, the exact cards in your hand change the correct play. These are called composition-dependent decisions.
The most important ones:
| Your Hand | Dealer | Basic Says | Optimal Says | When |
|---|---|---|---|---|
| 10+6=16 | 10 | Hit | Stand | 10 in hand reduces dealer 10 probability |
| 9+7=16 | 10 | Hit | Hit | No composition effect |
| 10+2=12 | 4 | Stand | Hit | Having a 10 means fewer 10s to bust on |
| 9+3=12 | 4 | Stand | Stand | Standard play holds |
| 7+5=12 | 3 | Hit | Stand | Composition favors standing |
| A+4=soft 15 | 4 | Hit | Double | Single/double deck only |
| 2+2+5+7=16 | 10 | Hit | Stand | Multi-card 16 = stand (many small cards removed) |
The pattern: when your hand contains cards that would otherwise help or hurt you, removing them from the deck changes the probabilities enough to flip the optimal play.
Composition-Dependent Decisions Explained
Here's the math behind the most common composition-dependent play — 16 vs 10:
With basic strategy, hitting 16 vs 10 has an EV of -0.5077, and standing has -0.5404. Hit wins by 0.0327.
But when your 16 is made of 10+6:
- The 10 in your hand means one fewer ten-value card in the remaining deck
- Your probability of busting when hitting increases (fewer helpful small cards)
- Standing EV improves to approximately -0.5190
- Hitting EV worsens to approximately -0.5228
Stand now wins by 0.0038. Small edge, but it's the mathematically correct play.
How Rules Change the Optimal Play
The number of composition-dependent decisions varies by rule set:
| Rule Set | Composition Hands | Impact |
|---|---|---|
| Single Deck, S17 | ~25 | Highest — every card matters more |
| Double Deck, S17 | ~18 | Significant |
| 6-Deck, S17 | ~12 | Moderate |
| 6-Deck, H17 | ~15 | H17 adds surrender compositions |
| 8-Deck, S17 | ~10 | Lowest — card removal diluted |
In practice, the fewer decks in play, the more composition-dependent decisions arise. This is because each card's removal has a bigger percentage impact on a smaller shoe. If you want to explore how deck count affects the game, our double deck blackjack guide covers this in depth. For real-world table configurations, our Atlantic City blackjack rules reference compares deck count and rule variations across AC casinos.
The Complete Optimal Strategy Tables
These tables show the optimal play for a standard 4-8 deck game with S17. Where composition-dependent plays exist, we note them with an asterisk (*).
Hard Totals: Optimal Plays (4-8 Deck, S17)
| Hand | 2 | 3 | 4 | 5 | 6 | 7 | 8 | 9 | 10 | A |
|---|---|---|---|---|---|---|---|---|---|---|
| 8 | H | H | H | H | H | H | H | H | H | H |
| 9 | H | D | D | D | D | H | H | H | H | H |
| 10 | D | D | D | D | D | D | D | D | H | H |
| 11 | D | D | D | D | D | D | D | D | D | D |
| 12 | H | H | S | S | S | H | H | H | H* | H |
| 13 | S | S | S | S | S | H | H | H | H | H |
| 14 | S | S | S | S | S | H | H | H | H | H |
| 15 | S | S | S | S | S | H | H | H | H/Rh | H |
| 16 | S | S | S | S | S | H | H | H/Rh | S*/Rh | H/Rh |
| 17+ | S | S | S | S | S | S | S | S | S | S/Rs |
Key: H = Hit, S = Stand, D = Double, Rh = Surrender (hit if not allowed), Rs = Surrender (stand if not allowed), * = composition-dependent
Note the asterisk on 16 vs 10: if your 16 contains a 10-value card (10+6, J+6, Q+6, K+6), stand instead of hitting. This is the single most valuable composition-dependent play. Understanding when to play hard 13 vs dealer 2 follows similar composition logic.
Soft Totals: Optimal Plays
| Hand | 2 | 3 | 4 | 5 | 6 | 7 | 8 | 9 | 10 | A |
|---|---|---|---|---|---|---|---|---|---|---|
| A,2 | H | H | H | D | D | H | H | H | H | H |
| A,3 | H | H | H | D | D | H | H | H | H | H |
| A,4 | H | H | D | D | D | H | H | H | H | H |
| A,5 | H | H | D | D | D | H | H | H | H | H |
| A,6 | H | D | D | D | D | H | H | H | H | H |
| A,7 | Ds | Ds | Ds | Ds | Ds | S | S | H | H | H |
| A,8 | S | S | S | S | Ds | S | S | S | S | S |
| A,9 | S | S | S | S | S | S | S | S | S | S |
Key: Ds = Double if allowed, otherwise Stand
Soft hands are where many players leave the most money on the table. Doubling A,7 vs 3-6 instead of standing costs you roughly 0.02% per instance. If you struggle with soft totals, our blackjack strategy flashcards drill these situations until they're automatic.
Pairs: Optimal Splits
| Pair | 2 | 3 | 4 | 5 | 6 | 7 | 8 | 9 | 10 | A |
|---|---|---|---|---|---|---|---|---|---|---|
| 2,2 | P/H | P | P | P | P | P | H | H | H | H |
| 3,3 | P/H | P | P | P | P | P | H | H | H | H |
| 4,4 | H | H | H | P/H | P/H | H | H | H | H | H |
| 5,5 | D | D | D | D | D | D | D | D | H | H |
| 6,6 | P/H | P | P | P | P | H | H | H | H | H |
| 7,7 | P | P | P | P | P | P | H | H | H | H |
| 8,8 | P | P | P | P | P | P | P | P | P/Rp | P/Rp |
| 9,9 | P | P | P | P | P | S | P | P | S | S |
| 10,10 | S | S | S | S | S | S | S | S | S | S |
| A,A | P | P | P | P | P | P | P | P | P | P |
Key: P = Split, P/H = Split if DAS, otherwise Hit, Rp = Surrender if allowed, otherwise Split
Never split 10s might seem obvious, but some advantage players do split them in positive counts — our guide on when to split 10s explains the math. And never split 5s — always double instead.
Surrender Decisions Most Players Miss
Late surrender is the most underused play in blackjack. When available, it cuts 0.08% off the house edge — but only if you actually use it. Check our complete blackjack surrender guide for the full reference.
| Your Hand | Dealer Upcard | Action | EV Saved |
|---|---|---|---|
| 16 (not 8+8) | 9 | Surrender | +0.028 |
| 16 (not 8+8) | 10 | Surrender | +0.055 |
| 16 (not 8+8) | A | Surrender | +0.042 |
| 15 | 10 | Surrender | +0.015 |
| 15 | A (H17) | Surrender | +0.010 |
| 17 | A (H17) | Surrender | +0.019 |
Most players feel embarrassed to surrender — it looks like giving up. But mathematically, getting back half your bet when you're a heavy underdog is strictly better than playing out a losing hand. It's not giving up, it's cutting your losses.
S17 vs H17: How Dealer Rules Change Your Strategy
Strategy Level vs House Edge: 7 Approaches Compared
House edge for 7 blackjack strategy levels on a 6-deck S17 game. Lime = best (under 1%), yellow = average, red = poor. Dashed line marks basic strategy at 0.50%. Card counting is the only approach that gives the player a positive edge.
House edge values based on a standard 6-deck S17 game with 3:2 blackjack payout. Card counting edge assumes Hi-Lo system with 1:8 spread and 75% penetration. Actual results vary by specific rules and execution.
The 8 Hands That Flip Between S17 and H17
When the dealer hits soft 17 instead of standing, several optimal plays change. These are the hands where the switch matters:
| Hand | vs Dealer | S17 Play | H17 Play | Why |
|---|---|---|---|---|
| 11 | A | Double | Double | Both agree — but H17 makes doubling even more profitable |
| A,7 | 2 | Double | Stand | Dealer hitting A,6 in H17 makes doubling less favorable |
| A,8 | 6 | Double | Stand | Same — H17 dealer hits improve their hand |
| 15 | A | Hit | Surrender | H17 makes dealer's Ace much stronger |
| 17 | A | Stand | Surrender | H17 means dealer will improve past 17 |
| 8,8 | A | Split | Surrender/Split | Marginal — both very close in H17 |
| A,3 | 4 | Hit | Double | Edge case in some rule sets |
| 9 | 2 | Hit | Double | Deck-dependent |
House Edge Math: The 0.22% Swing
The difference between S17 and H17 is exactly 0.22% in house edge. Here's why that number is consistent across rule sets:
When the dealer has soft 17 (A+6 = 17), standing gives them a pat hand with a decent chance of winning. Hitting gives them a chance to improve to 18-21 but also a chance to bust. On average, hitting soft 17 helps the dealer more than it hurts them.
The formula:
In plain English: the probability the dealer gets soft 17 multiplied by how much hitting helps them versus standing. Across all situations, this nets out to approximately +0.22% for the house.
Why H17 Hurts on Soft Doubles
The H17 rule particularly affects your soft double decisions. When you double A,7 vs dealer's 2 in S17, the dealer stands on soft 17 — your 18 is strong. In H17, the dealer hits soft 17, improving to 18+ about 37% of the time. This makes your 18 significantly weaker, flipping the correct play from double to stand.
7 Common Mistakes That Ruin Your Optimal Strategy
Even players who know the strategy make execution errors. Here are the most costly.
Standing on 16 vs 10 (The #1 Error)
This is the most misplayed hand in blackjack �� and it cuts both ways. Basic strategy says always hit 16 vs 10. Optimal strategy says it depends on composition:
- 10+6: Stand (composition-dependent — the 10 reduces bust probability changes)
- 9+7: Hit (standard composition, hitting is slightly better)
- 5+5+6: Hit (multi-card, but no 10 removed)
- 3+4+9: Stand (multi-card 16 without high cards = stand)
The general rule: if your 16 was made with a 10-value card, stand. If not, hit. If it's a multi-card 16 with three or more small cards, stand (you've already removed cards that would help you).
Test different hand compositions with our session simulator to see how the outcomes change over thousands of hands.
Ignoring Soft Totals
Many players treat soft hands like hard hands — standing on A,7 (soft 18) no matter what. But soft 18 vs dealer 9, 10, or A is a losing hand that should be hit. And soft 18 vs 3-6 should be doubled for maximum value.
The cost of playing soft hands incorrectly is roughly 0.05-0.10% in house edge — significant enough to matter.
Never Surrendering
About 70% of blackjack players never use surrender even when it's available. This costs approximately 0.08% in house edge. The most valuable surrender: 16 vs 10, which saves 5.5 cents per dollar wagered.
The EV of Late Surrender by Hand
| Situation | EV(Play Out) | EV(Surrender) | Saved per \100 bet |
|---|---|---|---|
| 16 vs 10 | -0.5404 | -0.5000 | $4.04 |
| 16 vs A | -0.5423 | -0.5000 | $4.23 |
| 16 vs 9 | -0.5151 | -0.5000 | $1.51 |
| 15 vs 10 | -0.5220 | -0.5000 | $2.20 |
| 17 vs A (H17) | -0.5387 | -0.5000 | $3.87 |
Every one of these hands saves money by surrendering. Your ego might not like it, but your bankroll calculator will thank you.
Optimal Strategy by Game Variant
Double Deck: Key Differences
Double deck is the sweet spot for optimal strategy. Fewer cards mean more composition-dependent situations, and the base house edge is lower (0.35% vs 0.54% for 6-deck). Our complete double deck guide covers rule checking in detail.
Key double deck optimal plays that differ from 6-deck:
- Double 9 vs 2 (hit in 6-deck)
- Double A,7 vs 2 (stand in 6-deck)
- Double 11 vs A in all S17 games (same in 6-deck S17, hit in 6-deck H17)
Spanish 21: Bonus Payouts Change Everything
Spanish 21 removes all 10s from the deck, creating a completely different game. The optimal strategy is radically different — you double more aggressively because the bonus payouts for 5+ card 21, suited 6-7-8, and 7-7-7 change the EV calculations entirely. See our Spanish 21 card counting guide for the modified strategy.
Single Deck 6:5: The Trap to Avoid
Never play single deck 6:5 blackjack. The 6:5 payout adds 1.39% to the house edge, completely destroying the single deck advantage. A single deck 6:5 game (1.56% edge) is worse than an 8-deck 3:2 game (0.58% edge).
The blackjack early payout feature sometimes offered at online casinos can partially compensate for bad rules, but it's never worth playing a 6:5 game when a 3:2 alternative exists.
After Optimal Strategy: Introduction to Card Counting
When the Count Changes the Optimal Play
Once you've mastered optimal basic strategy, card counting is the next level. Counting doesn't replace optimal strategy — it builds on top of it. You still make the optimal play for every hand, but now you also adjust your bet size based on the remaining card composition.
The true count tells you when the remaining shoe favors the player (positive count = more 10s and Aces remaining). At TC +2 or higher, you increase your bet. At TC 0 or negative, you bet the minimum.
For a detailed breakdown of counting systems, Dana White's blackjack approach illustrates how high-stakes players combine strategy with bankroll management. And our bankroll calculator helps you determine proper bet sizing for any spread.
Index Numbers: The Bridge
Index numbers are the bridge between optimal strategy and card counting. They tell you at what true count a specific play changes. For example:
| Hand | vs Dealer | Basic Play | Index | Count Play |
|---|---|---|---|---|
| 16 | 10 | Hit | 0 | Stand at TC ≥ 0 |
| 15 | 10 | Hit | +4 | Stand at TC ≥ +4 |
| 12 | 3 | Hit | +2 | Stand at TC ≥ +2 |
| 12 | 2 | Hit | +3 | Stand at TC ≥ +3 |
| 10 | 10 | Hit | +4 | Double at TC ≥ +4 |
| 10 | A | Hit | +4 | Double at TC ≥ +4 |
| Insurance | — | Never | +3 | Take at TC ≥ +3 |
The "Illustrious 18" index plays capture roughly 80% of the value from count-dependent strategy deviations. Master optimal strategy first, then layer these on top.
Test Your Optimal Strategy Knowledge
Interactive Rule Checker
Use this trainer to test any hand combination against the optimal play. Select your cards, the dealer's upcard, and the table rules — the trainer shows you the optimal decision, compares it to basic strategy, and explains when they differ.
FAQ
Frequently Asked Questions

Evgeniy Volkov
Verified ExpertFullstack developer with a background in mathematics. I build the calculators and game-style tools on ToolsGambling with Pixi.js and modern web tech, and every result uses transparent probability formulas you can verify yourself.